组件化是什么,有什么优点
意义:不相互依赖,可以相互交互,任意组合,高度解耦,自由拆卸,自由组装,重复利用,
分层独立化
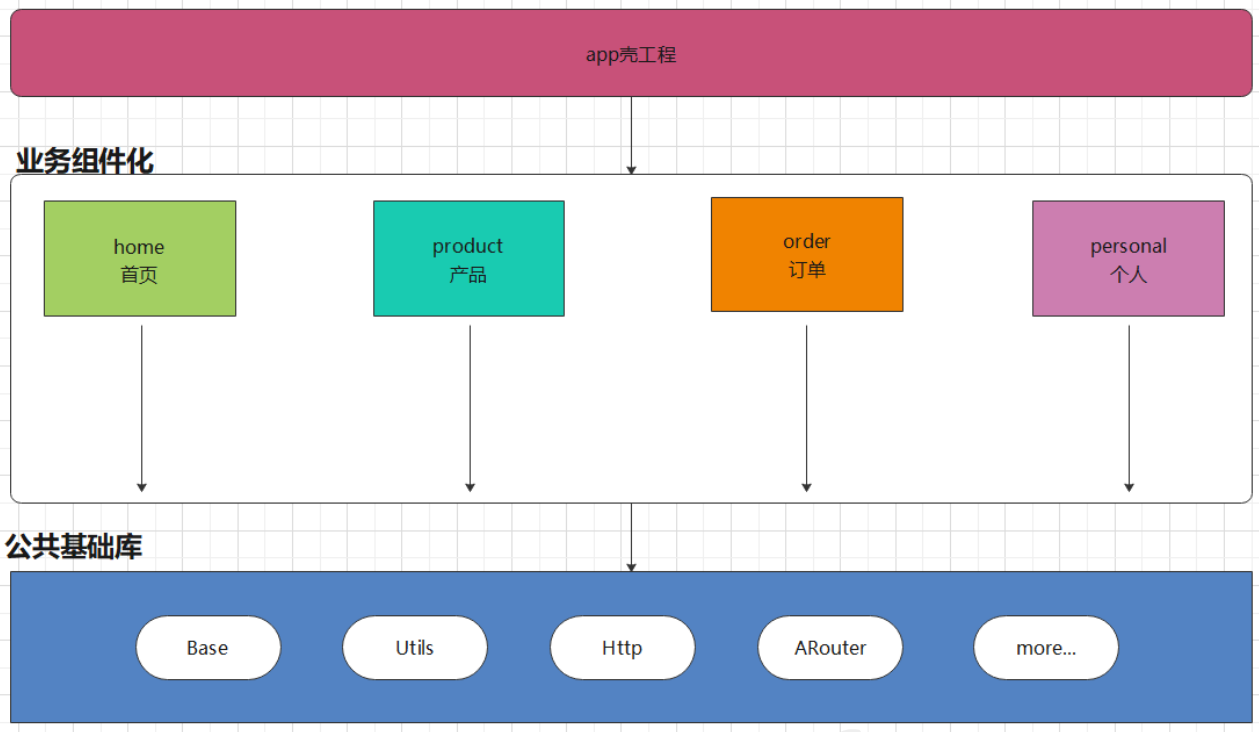
此时:app不再是老大,子模块都是小弟
组件化后,所有的 module 都平起平坐,app的module在组件化中是个壳子,这也是为什么成为 app壳工程的原因。
这时候的优点 很少工作量就可以去掉其中一些模块,自由组合需要的功能
项目结构
通常有一个 common 或者 base 基础模块,定义跳转的路由常量,功能接口
依赖这个模块的是各个业务模块,例如个人、订单、首页
Gradle 配置
如何配置各个模块集成环境/组件环境
目标:debug 各个模块独立运行、release 集成打包(各个模块当 lib)
优化 gradle 文件
公用的内容抽取,放到一个共同依赖的gradle文件,例如为 common.gradle
外部库、相同的闭包配置都可以放里面
以及常量配置项放到 ext {} 里面
apply plugin: 'kotlin-android'
apply plugin: 'kotlin-kapt'

ext {

    // 测试环境  /  正式环境  (组件化环境  /  集成化环境)
    isRelease = true;

    // 定义一个包名,用于存放APT生成的所有类文件
    packageNameForAPT = "com.xiangxue.new_modular_customarouter";

    app_android = [
            compileSdkVersion        : 29,
            buildToolsVersion        : "29.0.3",
            applicationId            : "com.xiangxue.new_modular_customarouter",
            minSdkVersion            : 15,
            targetSdkVersion         : 29,
            versionCode              : 1,
            versionName              : "1.0",
            testInstrumentationRunner: "androidx.test.runner.AndroidJUnitRunner"
    ]

    // order,personal,自己的包名
    app_appid = [
            "order": "com.xiangxue.new_modular_customarouter.order",
            "personal": "com.xiangxue.new_modular_customarouter.personal"
    ]

    // 测试环境的服务器地址,和,正式环境服务器地址
    url = [
            "debug"   : "https://11.22.33.44/debug",
            "release" : "https://55.66.77.88/release"
    ]

    // 定义依赖项,体现真实开发项目的过程
    app_dependencies = [
            "appcompat": 'androidx.appcompat:appcompat:1.1.0',
            "constraint": 'androidx.constraintlayout:constraintlayout:1.1.3',
            "okhttp3"        : "com.squareup.okhttp3:okhttp:3.10.0",
            "retrofit"       : "com.squareup.retrofit2:retrofit:2.5.0",
            "fastjson"       : "com.alibaba:fastjson:1.2.58",
    ]

}

android {
……
}

dependencies {
……
}
各个模块的 build.gradle 再应用这公共配置
apply from: '../common.gradle'
Phone Module和Android Library区别、切换
Phone Module
apply plugin: 'com.android.application'

// 有包名
applicationId app_appid.order
Android Library
apply plugin: 'com.android.library'

// 或者 java 库
apply plugin: 'java-library'
配置“正式环境”,“测试环境”
组件化开发规范
order order前缀(src类 和 res资源) personal personal前缀( src类 和 res资源) app 可不改,让它默认
组件化开发的临时代码,集成化打包时动态隔离
首先是 区分清单文件
    // 配置资源路径,方便测试环境,打包不集成到正式环境
    sourceSets {
        main {
            if (!isRelease) {
                // 如果是组件化模式,需要单独运行时
                manifest.srcFile 'src/main/debug/AndroidManifest.xml'
            } else {
                // 集成化模式,整个项目打包apk
                manifest.srcFile 'src/main/AndroidManifest.xml'
                java {
                    // release 时 debug 目录下文件不需要合并到主工程
                    exclude '**/debug/**'
                }
                // resources {
                   // exclude '**/debug/**'
                // }
            }
        }
    }

注意事项:
src/main/debug/AndroidManifest.xml
子模块包名/debug/测试代码.java
各模块 gradle 配置
写一个公共 gradle,各模块都可以用
config.gradle
ext {

    // 测试环境  /  正式环境  (组件化环境  /  集成化环境)
    isRelease = true;

    // 定义一个包名,用于存放APT生成的所有类文件
    packageNameForAPT = "com.xiangxue.new_modular_customarouter";

    app_android = [
            compileSdkVersion        : 29,
            buildToolsVersion        : "29.0.3",
            applicationId            : "com.xiangxue.new_modular_customarouter",
            minSdkVersion            : 15,
            targetSdkVersion         : 29,
            versionCode              : 1,
            versionName              : "1.0",
            testInstrumentationRunner: "androidx.test.runner.AndroidJUnitRunner"
    ]

    // order,personal,自己的包名
    app_appid = [
            "order": "com.xiangxue.new_modular_customarouter.order",
            "personal": "com.xiangxue.new_modular_customarouter.personal"
    ]

    // 测试环境的服务器地址,和,正式环境服务器地址
    url = [
            "debug"   : "https://11.22.33.44/debug",
            "release" : "https://55.66.77.88/release"
    ]

    // 定义依赖项,体现真实开发项目的过程
    app_dependencies = [
            "appcompat": 'androidx.appcompat:appcompat:1.1.0',
            "constraint": 'androidx.constraintlayout:constraintlayout:1.1.3',
            "okhttp3"        : "com.squareup.okhttp3:okhttp:3.10.0",
            "retrofit"       : "com.squareup.retrofit2:retrofit:2.5.0",
            "fastjson"       : "com.alibaba:fastjson:1.2.58",
    ]

}
app.gradle
注意如果是集成化模式,做发布版本时,各个模块都不能独立运行,需要 implementation进来
apply plugin: 'com.android.application'

// 定义变量,可以定义变量,也可以不定义变量
def app_android = this.getRootProject().ext.app_android;
def app_dependencies = this.rootProject.ext.app_dependencies;

android {
    // compileOptions.encoding = "GBK"
    compileSdkVersion app_android.compileSdkVersion
    buildToolsVersion app_android.buildToolsVersion
    defaultConfig {
        applicationId app_android.applicationId
        minSdkVersion app_android.minSdkVersion
        targetSdkVersion app_android.targetSdkVersion
        versionCode app_android.versionCode
        versionName app_android.versionName
        testInstrumentationRunner app_android.testInstrumentationRunner

        // 这个方法接收三个非空的参数,第一个:确定值的类型,第二个:指定key的名字,第三个:传值(必须是String)
        // 为什么需要定义这个?因为src代码中有可能需要用到跨模块交互,如果是组件化模块显然不行
        // 切记:不能在android根节点,只能在defaultConfig或buildTypes节点下
        buildConfigField("boolean", "isRelease", String.valueOf(isRelease))

        // 在gradle文件中配置选项参数值(用于APT传参接收)
        // 同学们注意:切记:必须写在defaultConfig节点下
        javaCompileOptions {
            annotationProcessorOptions {
                // project.getName() == app
                arguments = [moduleName: project.getName(), packageNameForAPT: packageNameForAPT]
            }
        }
    }
    buildTypes {
        release {
            minifyEnabled false
            proguardFiles getDefaultProguardFile('proguard-android-optimize.txt'), 'proguard-rules.pro'
        }
    }
}

dependencies {
    implementation fileTree(dir: 'libs', include: ['*.jar'])

    // 循环引入第三方库
    app_dependencies.each {k, v ->
        // if (k != "aa" && v != "cc") {}
        implementation v
    }

    testImplementation 'junit:junit:4.12'
    androidTestImplementation 'androidx.test:runner:1.2.0'
    androidTestImplementation 'androidx.test.espresso:espresso-core:3.2.0'

    // 公共基础库
    implementation project(":common")

    //  arouter 专用 注解模块
    implementation project(":arouter_annotation")

    // 使用注解处理器
    // arouter 专用 注解处理器
    annotationProcessor project(':arouter_compiler')

    // 如果是集成化模式,做发布版本时。各个模块都不能独立运行了
    if (isRelease) {
        // 进if,集成,融为一体(order,personal)

        // 订单模块
        implementation project(":order")

        // 个人中心模块
        implementation project(":personal")
    }
}
order.gradle , personal 模块类似
if (isRelease) { // 如果是发布版本时,各个模块都不能独立运行
    apply plugin: 'com.android.library'
} else {
    apply plugin: 'com.android.application'
}

android {
    compileSdkVersion app_android.compileSdkVersion
    buildToolsVersion app_android.buildToolsVersion
    defaultConfig {
        // applicationId app_appid.order
        if (!isRelease) { // 如果是集成化模式,不能有applicationId
            applicationId app_appid.order // 组件化模式能独立运行才能有applicationId
        }

        minSdkVersion app_android.minSdkVersion
        targetSdkVersion app_android.targetSdkVersion
        versionCode app_android.versionCode
        versionName app_android.versionName
        testInstrumentationRunner app_android.testInstrumentationRunner

        // 这个方法接收三个非空的参数,第一个:确定值的类型,第二个:指定key的名字,第三个:传值(必须是String)
        // 为什么需要定义这个?因为src代码中有可能需要用到跨模块交互,如果是组件化模块显然不行
        // 切记:不能在android根节点,只能在defaultConfig或buildTypes节点下
        buildConfigField("boolean", "isRelease", String.valueOf(isRelease))

        // 都是为了 传递给 注解处理器
        // 在gradle文件中配置选项参数值(用于APT传参接收)
        // 切记:必须写在defaultConfig节点下
        javaCompileOptions {
            annotationProcessorOptions {
                // project.getName() == order
                // this.project.getName() == order
                // this.getProject().getName() == order
                arguments = [moduleName: project.getName(), packageNameForAPT: packageNameForAPT]
            }
        }
    }

    buildTypes {
        release {
            minifyEnabled false
            proguardFiles getDefaultProguardFile('proguard-android-optimize.txt'), 'proguard-rules.pro'
        }
    }

    // 配置资源路径,方便测试环境,打包不集成到正式环境
    sourceSets {
        main {
            if (!isRelease) {
                // 如果是组件化模式,需要单独运行时
                manifest.srcFile 'src/main/debug/AndroidManifest.xml'
            } else {
                // 集成化模式,整个项目打包apk
                manifest.srcFile 'src/main/AndroidManifest.xml'
                java {
                    // release 时 debug 目录下文件不需要合并到主工程
                    exclude '**/debug/**'
                }
                // resources {
                   // exclude '**/debug/**'
                // }
            }
        }
    }
}

dependencies {
    implementation fileTree(dir: 'libs', include: ['*.jar'])

    /*implementation 'androidx.appcompat:appcompat:1.1.0'
    implementation 'androidx.constraintlayout:constraintlayout:1.1.3'*/

    // 循环引入第三方库
    app_dependencies.each {k, v ->implementation v}

    testImplementation 'junit:junit:4.12'
    androidTestImplementation 'androidx.test:runner:1.2.0'
    androidTestImplementation 'androidx.test.espresso:espresso-core:3.2.0'

    // 公共基础库
    implementation project(":common")

    // 注解模块
    implementation project(":arouter_annotation")

    // 使用注解处理器
    // 注解处理器
    annotationProcessor project(':arouter_compiler')
}